


Loopy Little Bag - free pattern
Announcing the first freddyknits free pattern....
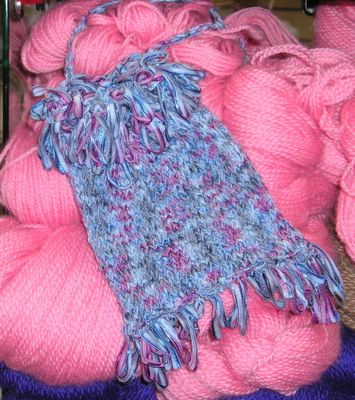
the Loopy Little Bag!
Just in time for spring, here is a free, easy pattern for a girly bag with a loopy fringe. It knits up quickly with one skein of Berroco Zen. If you knit this, send me a comment and/or a photo to let me know how it turned out.
Loopy Little Bag - one skein of Berocco Zen Ribbon
Materials
Insert right needle into stitch as if to knit. Form a short loop with working yarn and pass loop between needles from back to front. Holding loop behind work with middle finger of right hand, pass stitch from left to right needle. Continuing to hold loop behind work, insert tip of left needle under two new stitches on right needle and knit the stitch. Pull on the loop to tighten it up. Repeat this stitch across the row.
Top Loop Stitch Border (side 1)
Cast on 30 stitches.
Row 1 (RS)– Knit.
Row 2 (WS) – Loop Stitch.
Row 3 – Knit.
Row 4 – Loop Stitch.
Body of Bag (side 1)
Row 1 (RS) – Knit.
Row 2 (WS) – Purl.
Continue in stockinette until bag measures 7”. End on a RS row.
Bottom Loop Border
Row 1 (WS) – Knit.
Row 2 (RS) – Knit.
Row 3 (WS) – Loop Stitch.
Row 4– Knit.
Row 5 – Loop Stitch.
Row 6 – Knit.
Row 7 – Knit.
Row 8 – Knit.
Body of Bag (side 2)
Continuing on from bottom border:
Row 1 (WS) – Purl.
Row 2 (RS) – Knit.
Continue in stockinette until this side of the bag matches the other side in length, minus the loop stitch border. To compare sides, fold bag down the middle of the bottom border, so that loops show on both sides of the bag. End on a RS row.
Top Loop Stitch Border (side 2)
.
Row 1 (WS) – Loop Stitch.
Row 2 (RS) – Knit.
Row 3 – Loop Stitch.
Row 4 – Knit.
Bind off.
Finishing
Fold bag between the bottom rows of loops. Sew up sides.
For purse string, double 6 yards of yarn and crochet a chain. Lace the chain through the top edge of the bag every 2 or 3 inches to gather the edges together. Weave ends of chain together to create a continuous chain.
the Loopy Little Bag!
Just in time for spring, here is a free, easy pattern for a girly bag with a loopy fringe. It knits up quickly with one skein of Berroco Zen. If you knit this, send me a comment and/or a photo to let me know how it turned out.

Loopy Little Bag - one skein of Berocco Zen Ribbon
Materials
- 1 ball Berrocco Zen Colors, or similar ribbon yarn
- Size 8 (US) needles
- Crochet hook
Insert right needle into stitch as if to knit. Form a short loop with working yarn and pass loop between needles from back to front. Holding loop behind work with middle finger of right hand, pass stitch from left to right needle. Continuing to hold loop behind work, insert tip of left needle under two new stitches on right needle and knit the stitch. Pull on the loop to tighten it up. Repeat this stitch across the row.
Top Loop Stitch Border (side 1)
Cast on 30 stitches.
Row 1 (RS)– Knit.
Row 2 (WS) – Loop Stitch.
Row 3 – Knit.
Row 4 – Loop Stitch.
Body of Bag (side 1)
Row 1 (RS) – Knit.
Row 2 (WS) – Purl.
Continue in stockinette until bag measures 7”. End on a RS row.
Bottom Loop Border
Row 1 (WS) – Knit.
Row 2 (RS) – Knit.
Row 3 (WS) – Loop Stitch.
Row 4– Knit.
Row 5 – Loop Stitch.
Row 6 – Knit.
Row 7 – Knit.
Row 8 – Knit.
Body of Bag (side 2)
Continuing on from bottom border:
Row 1 (WS) – Purl.
Row 2 (RS) – Knit.
Continue in stockinette until this side of the bag matches the other side in length, minus the loop stitch border. To compare sides, fold bag down the middle of the bottom border, so that loops show on both sides of the bag. End on a RS row.
Top Loop Stitch Border (side 2)
.
Row 1 (WS) – Loop Stitch.
Row 2 (RS) – Knit.
Row 3 – Loop Stitch.
Row 4 – Knit.
Bind off.
Finishing
Fold bag between the bottom rows of loops. Sew up sides.
For purse string, double 6 yards of yarn and crochet a chain. Lace the chain through the top edge of the bag every 2 or 3 inches to gather the edges together. Weave ends of chain together to create a continuous chain.
Copyright 2004, Lynne Frederickson Rago
Do not duplicate or distribute.
Items made from this pattern may not be sold.
You may print one copy for your personal use.
posted by freddyknits at Thursday, February 24, 2005
![]()
![]()
<< Home